
Before Installing:
2. Setting the timing requires patience and an understanding that the system is precise and may require some trial and error to get right. Once set correctly, however, it will probably never have to be readjusted. That's the beauty of an electronic ignition!
Version 1 and Version 2 Instructions below. Match the image to the product received.
V2 Installation Instructions: (enclosed 2 pickups, not exposed circuit board)

1. Make sure the main switch is off and the battery positive lead is disconnected and secured.
2. Remove the ignition cover on the right side of the bike, then remove the points plate and advance mechanism.
3. Disconnect the wires running to the points assembly and set it aside. Note the wire routing or take a picture.
4. Remove the points cam from the advance mechanism. Remove any shim washers at the base of the advance shaft.
5. Apply a light coating of grease or oil on the advancer shaft and install the rotor with the indent facing the "TF23" on the advancer. The two weights will have to be spread to fit the slots in the rotor.
Note: On some advancers there is a small pin located near the bottom of the advancer shaft. NOT the locating pin on the back of the advancer. If you have this pin on your advancer, tap the side of the pin with a screwdriver and a hammer or grind it off with small grinding tool or file. Clean with WD-40 to remove metal particles then apply light oil to prevent rust.
6. Once the rotor is attached to advancer check for free movement and proper tension on the return springs. Reinstall the advancer on the crankshaft. Align the pin on the advancer with the hole on the crankshaft.
7. Reinstall the hex washer and M10 bolt to the correct torque. Make sure the new plate does not come in contact with the advancer in any position.
8. Install ignition plate but do not fully tighten the 3 mounting screws, but they must be snug enough to hold the base plate to the motor. Route wiring the same as the original points assembly with the grommet in the same orientation.
9. Gently rotate the plate clockwise as far as it will go.
10. Wire connections: Disconnect the rear brake light switch black wire. Plug the male bullet terminal black wire from the new ignition in it's place. Plug the black wire from the brake switch into the female bullet terminal black wire on the new ignition harness. Connect the blue wire on the ignition to the blue harness wire that went to the old points ignition. Connect the yellow wire on the ignition to the yellow wire that went to the old points ignition. Make sure all wire connections are secure.
11. Reconnect the battery positive lead. Turn on the main switch
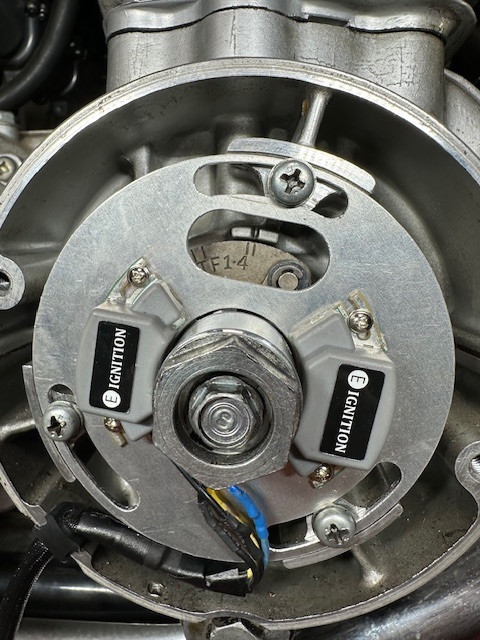
12. See photo below. The left pickup fires cylinders 1-4, the right pickup fires cylinders 2-3. Both pickups have some adjustment if needed. All timing adjustments should be made using the 2 advance timing marks which are about 1/2 inch to the right of the TF marks on the advance assembly. Rotate the crankshaft clockwise until the "F1-4" advance marks are aligned with the mark on the crankcase. This is visible through the hole in the plate. Remember do not line up the T or F lines, use the 2 lines that are 1/2 inch to the right of the T and F lines. If it's rotated too far just continue rotating clockwise until the marks are reached again.
13. See photo below. By hand turn the new rotor installed on the advancer clockwise until it stops, this is the fully advanced position with the weights and springs fully expanded. Rotate the ignition plate counter clockwise very slowly until the moment when the left pickup LED light turns on. Stop rotating as soon as the light turns on and tighten the 3 screws. Do not overtighten the screws. Double check the timing.
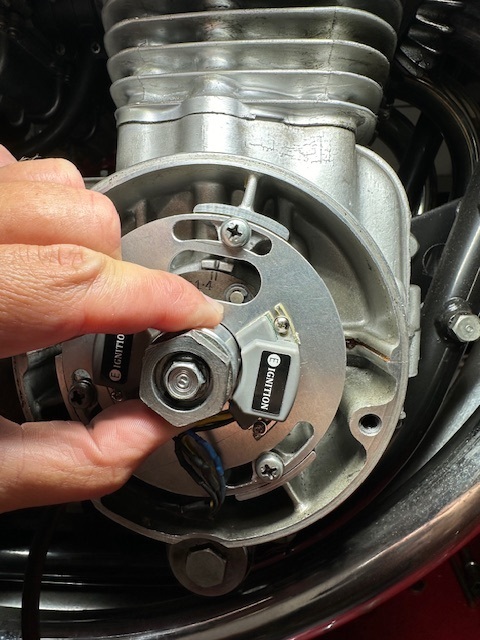
14. Repeat step 13 but with the 2-3 cylinder advance timing marks. Remember to turn the silver rotor clockwise fully and hold it in that position before checking the timing, don't let it spring back. If adjustment of the 2-3 pickup is needed, loosen the 2 pickup screws gently and make an adjustment then retighten carefully. Check to make sure pickup is secure. Recheck timing for cylinders 1-4 and 2-3.
15. Make sure the rear brake light works. Reinstall timing cover.
16. A dynamic timing light may be used to check the timing. If adjustment is necessary, turn power off before making any adjustments or loosening the screws that hold the ignition plate on.
V1 Installation Instructions: (exposed circuit board, not enclosed 2 pickups)

1. Make sure the main switch is off and the battery positive lead is disconnected and secured.
2. Remove the ignition cover on the right side of the bike, then remove the points plate and advance mechanism.
3. Disconnect the wires running to the points assembly and set it aside. Note the wire routing.
4. Remove the points cam from the advance mechanism. Remove any shim washers at the base of the advance shaft.
5. Apply a light coating of grease on the advancer shaft and install the rotor with the round indent on the top of the rotor aligned with the "TF14" mark on the advancer. The two weights will have to be extended to fit the slots in the rotor.
Note: On some advancers there is a small pin located near the bottom of the advancer shaft. NOT the locating pin on the back of the advancer. If you have this pin on your advancer, grind it off with small grinding tool or file. Clean with WD-40 to remove metal particles then apply light oil to prevent rust.
6. Once the rotor is attached to advancer check for free movement and proper tension on the return springs. Reinstall the advancer on the crankshaft. Align the pin on the advancer with the hole on the crankshaft.
7. Install ignition plate but do not fully tighten the 3 mounting screws. Route wiring the same as the original points assembly with the grommet in the same orientation. Do not connect any wires yet.
8. Gently rotate the plate clockwise as far as it will go.
9. Reinstall the large washer and M10 bolt to the correct torque. Make sure the new plate does not come in contact with the advancer in any position.
10. Wire connections: Disconnect the rear brake light switch black wire. Plug the male bullet terminal black wire from the new ignition. Plug the black wire from the brake switch into the female bullet terminal black wire on the ignition wire harness. Do NOT connect the blue and yellow wires yet.
11. Reconnect the battery positive lead. Turn on the main switch
12. Rotate the crankshaft clockwise at least 1 full rotation. The LED on the left side of the plate will be lit when the crankshaft rotates half. Continue rotating until the "F1-4" mark on the advancer is aligned with the mark on the crankcase. This is visible through the hole in the plate. If you go to far just continue rotating clockwise until the "F1-4" mark is reached again.
13. Rotate the ignition plate counter clockwise very slowly until the moment when the LED light turns on. Stop rotating as soon as the light turns on and tighten the 3 screws. Do not overtighten the screws. DON'T rotate the plate clockwise if you go too far just go back to step 12.
14. Rotate the crankshaft at least one full rotation and make sure the LED lights during half the rotation.
15. Connect the yellow wire and blue wire to the corresponding color on the stock harness (where the points used to connect). Make sure all wiring is secured.
16. Make sure the rear brake light works.
17. Do NOT attempt to set your timing using a dynamic timing light. It will damage the triggers if the ignition plate is loose/loosened while the bike is running. This will cause a ground failure that will short the capacitors inside the triggers. A dynamic timing light may be used to check advance only. If adjustment is necessary, turn power off before making any adjustments or loosening the screws that hold the ignition plate on.
Troubleshooting Tips:
1. Battery too low. The engine turns over, but the low battery means that the ignition is not getting enough voltage to work properly. Needs at least 8 Volts while cranking. Charge battery and try again.
2. Cylinders not firing. This can be as simple as a fouled spark plug that resulted from multiple start / stops. Confirm that both pickups LED lights illuminate when setting the timing. If they don't, disconnect all the wires from the new ignition to the factory harness and reinstall them confirming each connection is secure. If they are, then check for power at the black wire.
3. Spark plug caps are non-resistor type. The ignition requires that the spark plug caps are 5K resistor caps. We have them available here.
4. After installing the new ignition, it's important to check the timing again after riding a few hundred miles. Then you should be good to go for a very long time!
5. Still haven't figured out the issue, please refer to the forums